
The crisp, photo-realistic joy of our digital Christmas craft cotton prints will bring all the holiday cheer to your upcoming projects & handmade gifts. Enjoy the classics of Christmas Is Real and the colourful fun of Holiday Sweets.

The crisp, photo-realistic joy of our digital Christmas craft cotton prints will bring all the holiday cheer to your upcoming projects & handmade gifts. Enjoy the classics of Christmas Is Real and the colourful fun of Holiday Sweets.
Get your crafting on and “deck the halls” this holiday season with some festive prints. With the wide assortment of themed fabric collections, there’s no shortage of inspiration for fun decor and gift making!


Dressing up your home for this spooky day should possess you with eerie delight; whether it’s simple décor for the dinner table or spreading boo-tiful trimmings throughout your entire living space.

Whether you’re going out on the town or celebrating at home, make a statement and ring in the New Year wearing something luxurious or sparkly … or both!
Sequins, velvet and lace are go-to choices for fancy dresses and evening wear. Pick your favourite pattern and fabric and sew yourself something spectacular just in time to shout HAPPY NEW YEAR!


Pick a simple pattern with as few seams as possible.
Identify the “nap” or the direction of the sequins and cut all pieces in the same direction. Cut your pattern pieces from the wrong side, and from a single layer of fabric.
For best results, remove any sequins from the seam allowance by hand before sewing pieces together; particularly if they are large and stiff. You may need to hand sew ‘extra’ sequins along the seam afterwards to cover any blank areas.
Use a needle that’s thin and sharp and keep plenty of extras on hand. A thicker or dull needle can get stuck in the sequins when sewing.
Don’t iron, but do press. Very low heat (remember sequins may melt at high heat), press from the wrong side of your fabric and use a presser cloth (such as a scrap piece of cotton) to protect your sequins. Remember to test on a scrap piece beforehand.
Sequined fabric should always be lined to avoid skin irritation.


Cut all patterns pieces in a single layer. Lay your fabric nap side down and place your pattern pieces on the back to minimize slipping and use a lot of pins.
You want to make sure your pattern pieces are secure and won’t shift when sewing. Again, use a lot of pins or hand baste in place before sewing.
Use only the sew-in type of interfacing if needed.
To press use a towel or scrap fabric to protect the right side of your fabric while you steam the wrong side. Hover with the iron rather than apply any pressure so the velvet isn’t crushed.

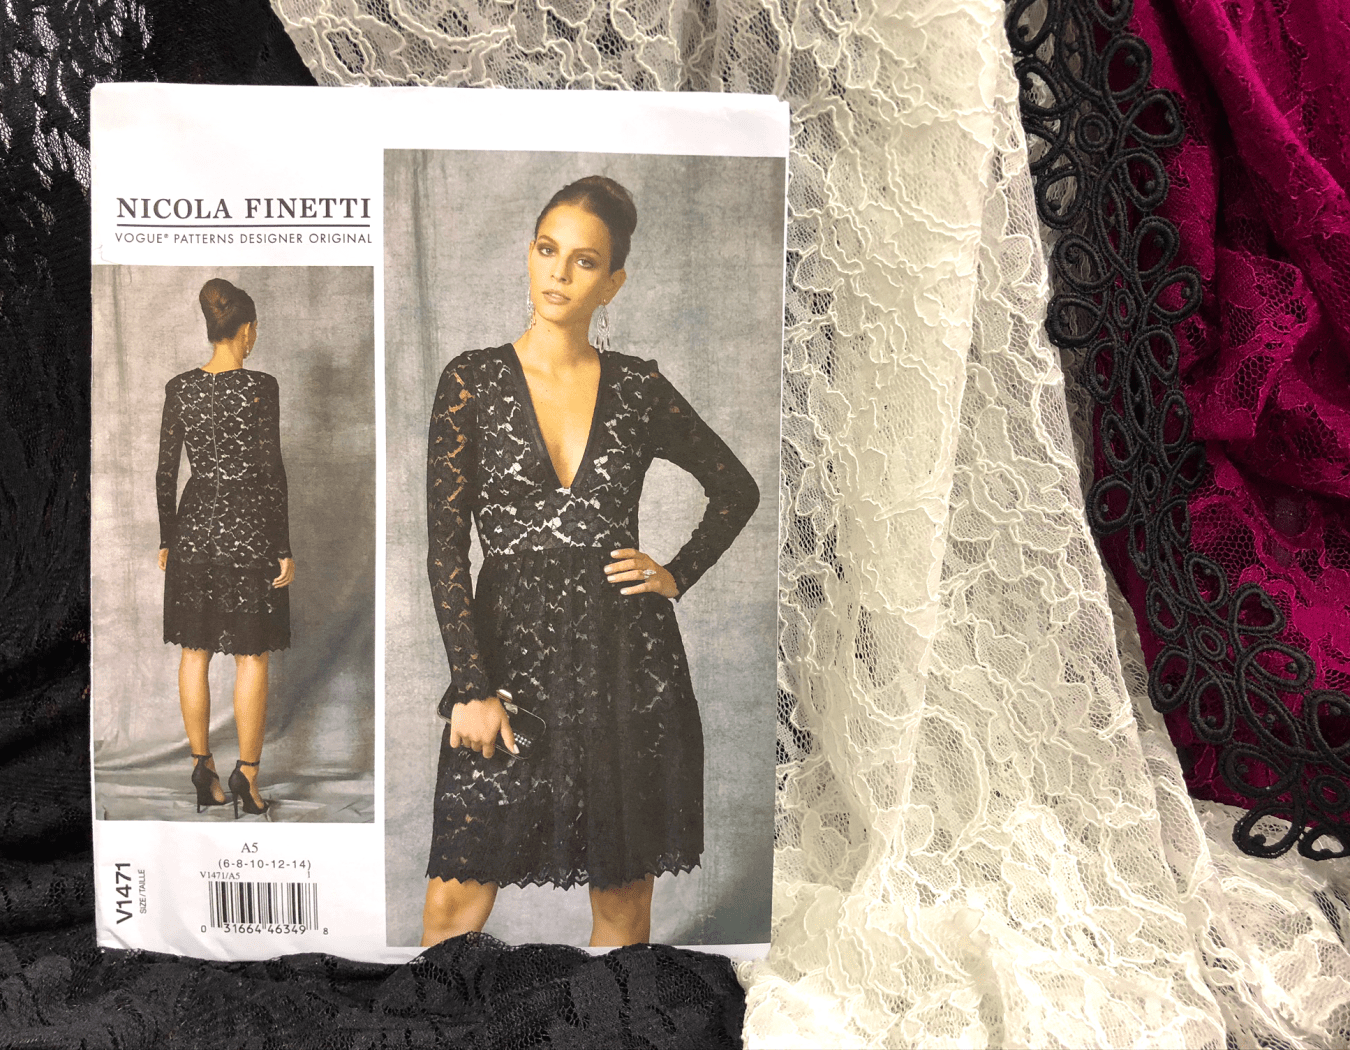
Check your lace fabric for any obvious right and wrong sides. Pay attention to the design elements of your lace and place the pattern pieces to take advantage of the design rather than trying to cut the lace straight across. Cut all patterns pieces in a single layer.
If pins don’t hold the lace pieces together, try small binder clips. Another option would be tailor tacks or a loose basting stitch which can be removed afterwards.
Use a narrow zig zag stitch for the seams. Use a strip of skin coloured fabric to bind the trimmed seam allowance; it will then be almost unnoticeable against your skin. Alternatively, use a French seam.
It’s that most wonderful time of year for festive cotton craft prints. From elegant poinsettias to friendly snowmen and winter scenes, a wide selection of new looks are available now for quilts, crafts, apparel and your home decor.


Item 0111345 | 100% cotton | 112cm

Item 0111704 | 100% cotton | 112cm

Item 0111708 | 100% cotton | 112cm

Item 0111706 | 100% cotton | 112cm
Pick your favourites and make this Quilted Table Runner to cherish for holidays to come.
‘Tis the time of year to start thinking about festive decor. The table tends to be the heart of the home whether for a family dinner or a holiday party. Pick your favourite craft prints and dress it up with a made-by-you Quilted Table Runner.


Download printable instructions here.
Make a quick, last minute DIY greeting card for a holiday party host, a neighbour or that special someone. It’s a simple no-sew project that the kids can help with … perfect for your new favourite holiday fabric.
Featured Fabric: Christmas Elegance (#0111345 | 100% cotton | Width 112cm)

What you need:

For this project we are creating a greeting card, but the same steps can be used to create gift tags or jazz up a plain gift bag.

What you do:
Download tree silhouette image here.
Pre-heat dry iron to silk setting. Cut your material and section of HeatnBond to match the size of your silhouette image.

Place HeatnBond Ultrahold paper side up on wrong side of material. Glide iron across paper side of HeatnBond Ultrahold lightly for 1-2 seconds. Allow material to cool. Trace the silhouette image onto the paper side of the HeatnBond Ultrahold and cutout.

Peel off paper backing. Adhesive should appear milky in colour. Note: shiny clear adhesive is a sign of overheating which will cause an insufficient bond, at which point you’ll need to reapply HeatnBond Ultrahold.

Place material right side up in desired position on card and iron for 4-6 seconds (Note: adjust ironing time for heavier materials/using several layers). Remove any adhesive from your warm iron easily with a dry cloth.


Once cooled, now it’s time to add flare to your card. Get creative with ribbon, trim, sequins or fabric embellishments!

Download instructions PDF here.
Dress your tree and deck the halls with these cute knitted ornaments. They also make great last minute gifts!


Download project instructions here.
It’s the season for velvet! Burnout, sparkle, crushed and so much more are luxurious choices for this pretty DIY Fringed Scarf. Pick all your favourites of this trendy fabric and make fancy gifts for someone special…like yourself!


Featured items:

Note: Not all products will be available at all stores. To find a suitable fabric alternative for your project, please ask a store team member for assistance.
Download printable instructions here.
Add a bright spring touch to your home decor with these cheery Easter wreaths!

Download printable PDF here.


